Friday, January 27, 2012

Friday Finish--Single Girl

Y'all are probably tired of me posting about this quilt...but I am so glad to have it finished!!  I wasn't sure it would get done this week.  My poor little kitty had surgery this week and it has been very dramatic with lots of blood loss, vet visits, etc.  She's on the mend, but it's been an ordeal.

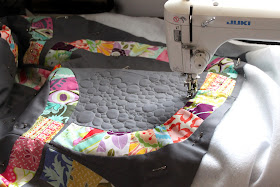
Last night I just decided I needed a stress reliever, so into my sewing room I went while the hubs was watching bball.  Oh, NC State...how very sad!  Anyway, here she is...after 3 hours of quilting and binding.  The bubble quilting took 5 bobbins...yes, 5!!  And this is a baby sized quilt, holy moley.  

Kinda lovin this picture!


Here is a close up of the quilting...bubble quilting in the solid, and wave quilting in the rings.


But can I just say I LOVE this quilt!!  I am glad to give it to my super sweet niece, but sad to see it leave my hands.  It just means I need to make another one :o)

Monday, January 23, 2012

Bubble Quilting the Single Girl

Our church has a quilting group that meets about every 2 weeks.  I've been out of the swing of things for a while, but am just getting back...and it was so much fun!!  Some of the ladies are older and VERY set in their ways, which is kinda funny to watch when they interact with each other, lol!!  Then there are some younger ladies, my age, that I really love hanging out with.  It was just a wonderful Friday night with them all.  I got my Single Girl all assembled and basted, and started quilting it when I got home Friday night.  I am trying out a new pattern, bubble quilting, and it is pretty fun!!  Definitely out of my comfort zone, trying to keep all those little circles actually ROUND and not lopsided.  I have to think when I quilt this one, which is something I tend not to do.  Usually when I quilt, my brain runs amok all over the place...it's nice to just zone out and enjoy the mental health break!  This pattern also takes a TON of thread, too, but I think I am going to LOVE it in the end!


Hoping to finish quilting this week!

In other news....my kitty went to the vet this morning to have her lady parts and front claws removed....I left 2 very sad children at school since Roxy has to stay overnight at the vet.  We may be going to see her after school, just for their peace of mind!

Thursday, January 19, 2012

Love This Girl!!

This is my first baby...born almost 9 years ago.  I can't believe how time is flying by.  I love this picture of her...we went outside to get some pics of this quilt, but I think this pic is my fave. She is fiercely loyal, loving, spunky, independent, LOVES to read, HATES to play piano but does it anyway because her momma said so :o) , and seems to knock over, spill, and break just about EVERYTHING in her path....boy, do I love this girl!!


Wednesday, January 18, 2012

WIP Wednesday

Between being off on Monday without kiddos at home...and then today Dayna was at home sick...I have been working on my niece's quilt.  Changed my mind again about her quilt and decided to dive into the Single Girls quilt...now that I know how to paper piece the rings!  The blocks have come together much more quickly than I thought they would!
  I just thought this was so cool to look at with all those pins in place!  It was easy to just pin all the blocks at one time and then chain sew.  Worked out great.
Here is a close up of the block...31 different fabrics and Kona Coal for the solid.  I love how the colors just pop!  I was playing around with the layout and really like this layout the best!
Here is the traditional layout....I'm still stuck on the first one though!!   

After honestly evaluating my WIPs, here are my stats:

In Progress:  10
Finished this week: 1

I am linking up here at Freshly Pieced!

WIP Wednesday at Freshly Pieced

Monday, January 16, 2012

Paper Piecing the Single Girl Quilt

I really, really love the Single Girl quilt pattern by Denyse Schmidt....but oh my word, all those pieces are mind numbing.  I was brave enough to buy the pattern and give it a try last summer, but things did not go well, at all.  My seam allowance was horrible, nothing fit right at all.  I was so bummed!!


So I got it in my head that SURELY I could paper piece this pattern!  And let me tell you....this is the way to go!  I didn't want to rip my hair out at any point while putting it together, and I actually think it takes less time to assemble.

I created my paper piecing pattern using a pencil and tracing paper.  I have a roll of tracing paper I got from the teacher supply store a while ago...and it's awesome for paper piecing.


 You need to keep the solid lines a the beginning and ends of each right, and at the tops and bottoms.  Trace around the solid lines and then the dotted lines.  Line up the dotted lines with the next piece in the ring.  Here I have the second ring, I lining up with J, then J lining up with K.

 At the end of the ring, finish tracing with the solid line at the end.
 Here is ring 2, ready for the paper piecing step!  The only issue I have with this method is that the rings are just a little too big to be able to copy on photocopier...so that means you have to create a template for each ring.  But that's still more accurate than cutting all those pieces by hand!
 If you've never paper pieced before, there are some great tutorials online...one of them here.

 Once all 4 rings are finished and pressed, trim and remove the paper.  You need to remove the paper before attaching to the background fabric.  I just followed the directions in the pattern for putting these blocks together.
 I used pins to remember which number each ring was.
 Here they are!!  Rings 1-4.  You can see the number pins in the middle reminding me what rings were which.

Now for the finished product!!  I can't believe how easy this ended up being compared to cutting each piece out one by one~can you tell that I HATE doing that!!  I can't wait to make an entire quilt using this method.  I didn't have to do any trimming up at the end, either...everything just matched up perfectly!  I hope this helps anyone else who feels the same way I do about the Single Girl!

Linking up at Skip to My Lou--Made by You Mondays!

Wednesday, January 11, 2012

WIP Wedesnday

I finished my vintage linen quilt top!  I am super excited about it, although there are a few things I'd do differently next time I make this pattern.  Next time, I will use framing diamonds, so I don't have to cut off any of the diamonds!  I will also make it bigger since I am just lovin this design!  I ended up quilting with a large stipple....I just didn't want the quilting to take away from the lovely vintage fabrics that remind me so much of my gramma and great aunt.  They are 2 of my dearest family members, even though my gramma died when I was 15.  She was such a fire cracker, but I loved that lady!!  We went toe-to-toe MANY times, too, for dumb stuff. But I have some wonderful memories of going to her house to spend the day, baking cookies at Christmas, watching Bonanza (snore), and sitting in the living room with her doing her crosswords....so many things.  She taught me how to make hot chocolate with milk (cuz that is the only way it even tastes good!!) and she had a secret language with my great aunt that was so funny to listen to!  I think that's just the way with sisters...me and my sis are the SAME way!!  Thanks for letting me indulge my nostalgic side...I miss her so much sometimes.

All that to say....the vintage linen quilt is done and I LOVE it! I have oodles of diamonds left over...thinking I need to have a giveaway to share :o)  Also, I am apologizing for the pics in advance....it's been raining on and off for a few days and haven't been able to get good pics!


 Close up of the quilting on the back...I used a pale pink for the backing.  

This is a quilt on the design wall for my sweet little niece :o)  Still figuring out how I want to lay out all the HSTs.


These lovely FQs came today!!!  I ordered them from Intrepid Thread on etsy (LOVE Julie, the lady behind the shop, btw) and am planning to make the girls matching bed quilts.  Planning to start after I get Julia's quilt finished!

Completed this week ~ 1
WIPs still in the works ~ 10

Linking up at Freshly Pieced!

WIP Wednesday at Freshly Pieced

Wednesday, January 4, 2012

Vintage Linen Quilt Top Basted

Maybe it's just me...but I HATE basting.  I have tried spray basting and am just not sold on it.  I think I prefer the pins since I know those suckers aren't moving!  Here she is...all laid out.


So, I thought I would also share a technique I learned when I first started quilting about 6 1/2 years ago now.  I am sure I read this somewhere, but I cannot remember.  Once the quilt is ready to be basted, put pins in 1/4 to 1/2 of the quilt, without snapping them closed.  To save your finger tips from the safety pins, use a spoon to snap the pins closed!


Here's a close up of the technique...maybe everyone already knows about this trick, but it was a revelation to me at the time!

Lift the pin up with the spoon....then close with the other hand.

I just had to take a picture at this angle!  My husband got me a telephoto lens for Christmas and I LOVE it!!

Now to quilt...any ideas on how to quilt it?  I will probably do an all-over design, but I'm just not sure yet.  I am working on my niece's quilt next!