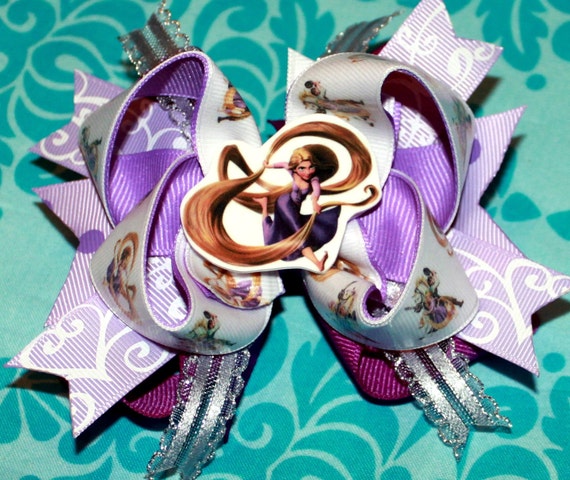
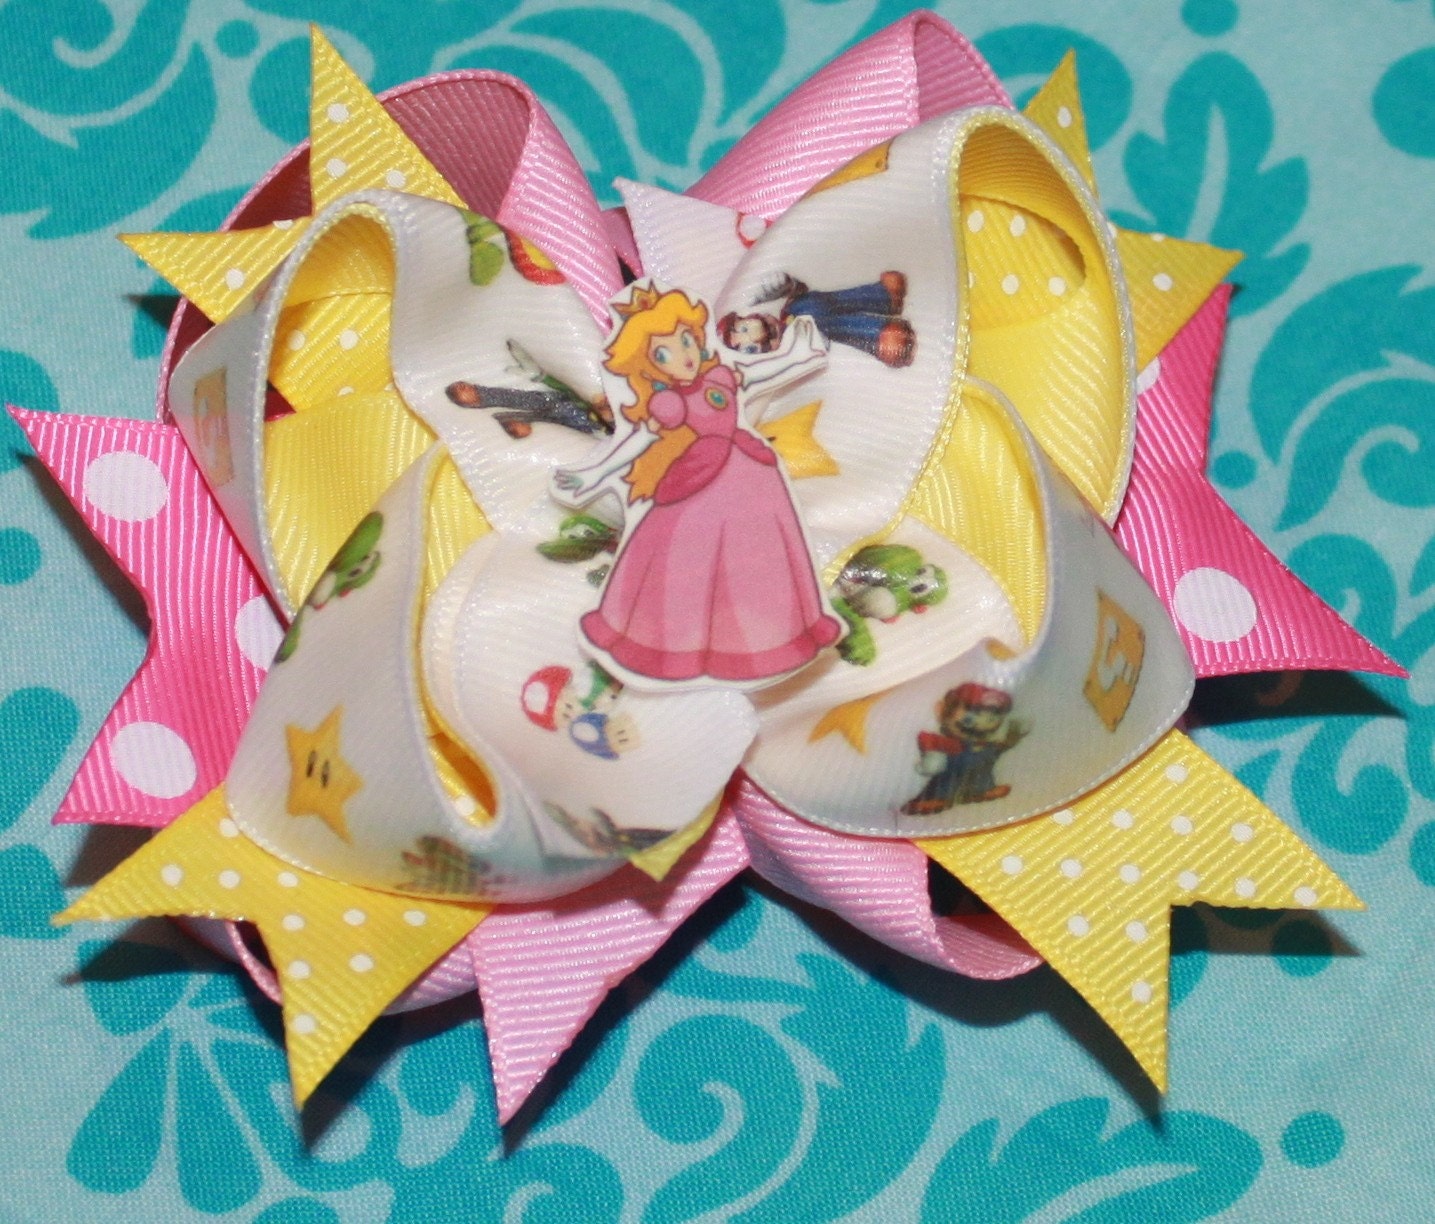
Thursday, March 31, 2011

Print Your Own Ribbon---Lessons Learned

Have you seen Tangled yet??  I am loving this movie and this princess!!

Sweet and Sassy Stacked/Layered Hairbow--Tangled--Repunzel
Tangled Hairbow

For a while now, I have been playing around with new ideas and techniques (well, new to me anyway :o) and I got the nerve to print my own ribbon.  It is much easier than I thought...although you have to really pay attention or things can go very wrong!  You're not actually printing your own ribbon, but ironing the images onto the ribbon with iron transfer paper that you have printed your designs on.

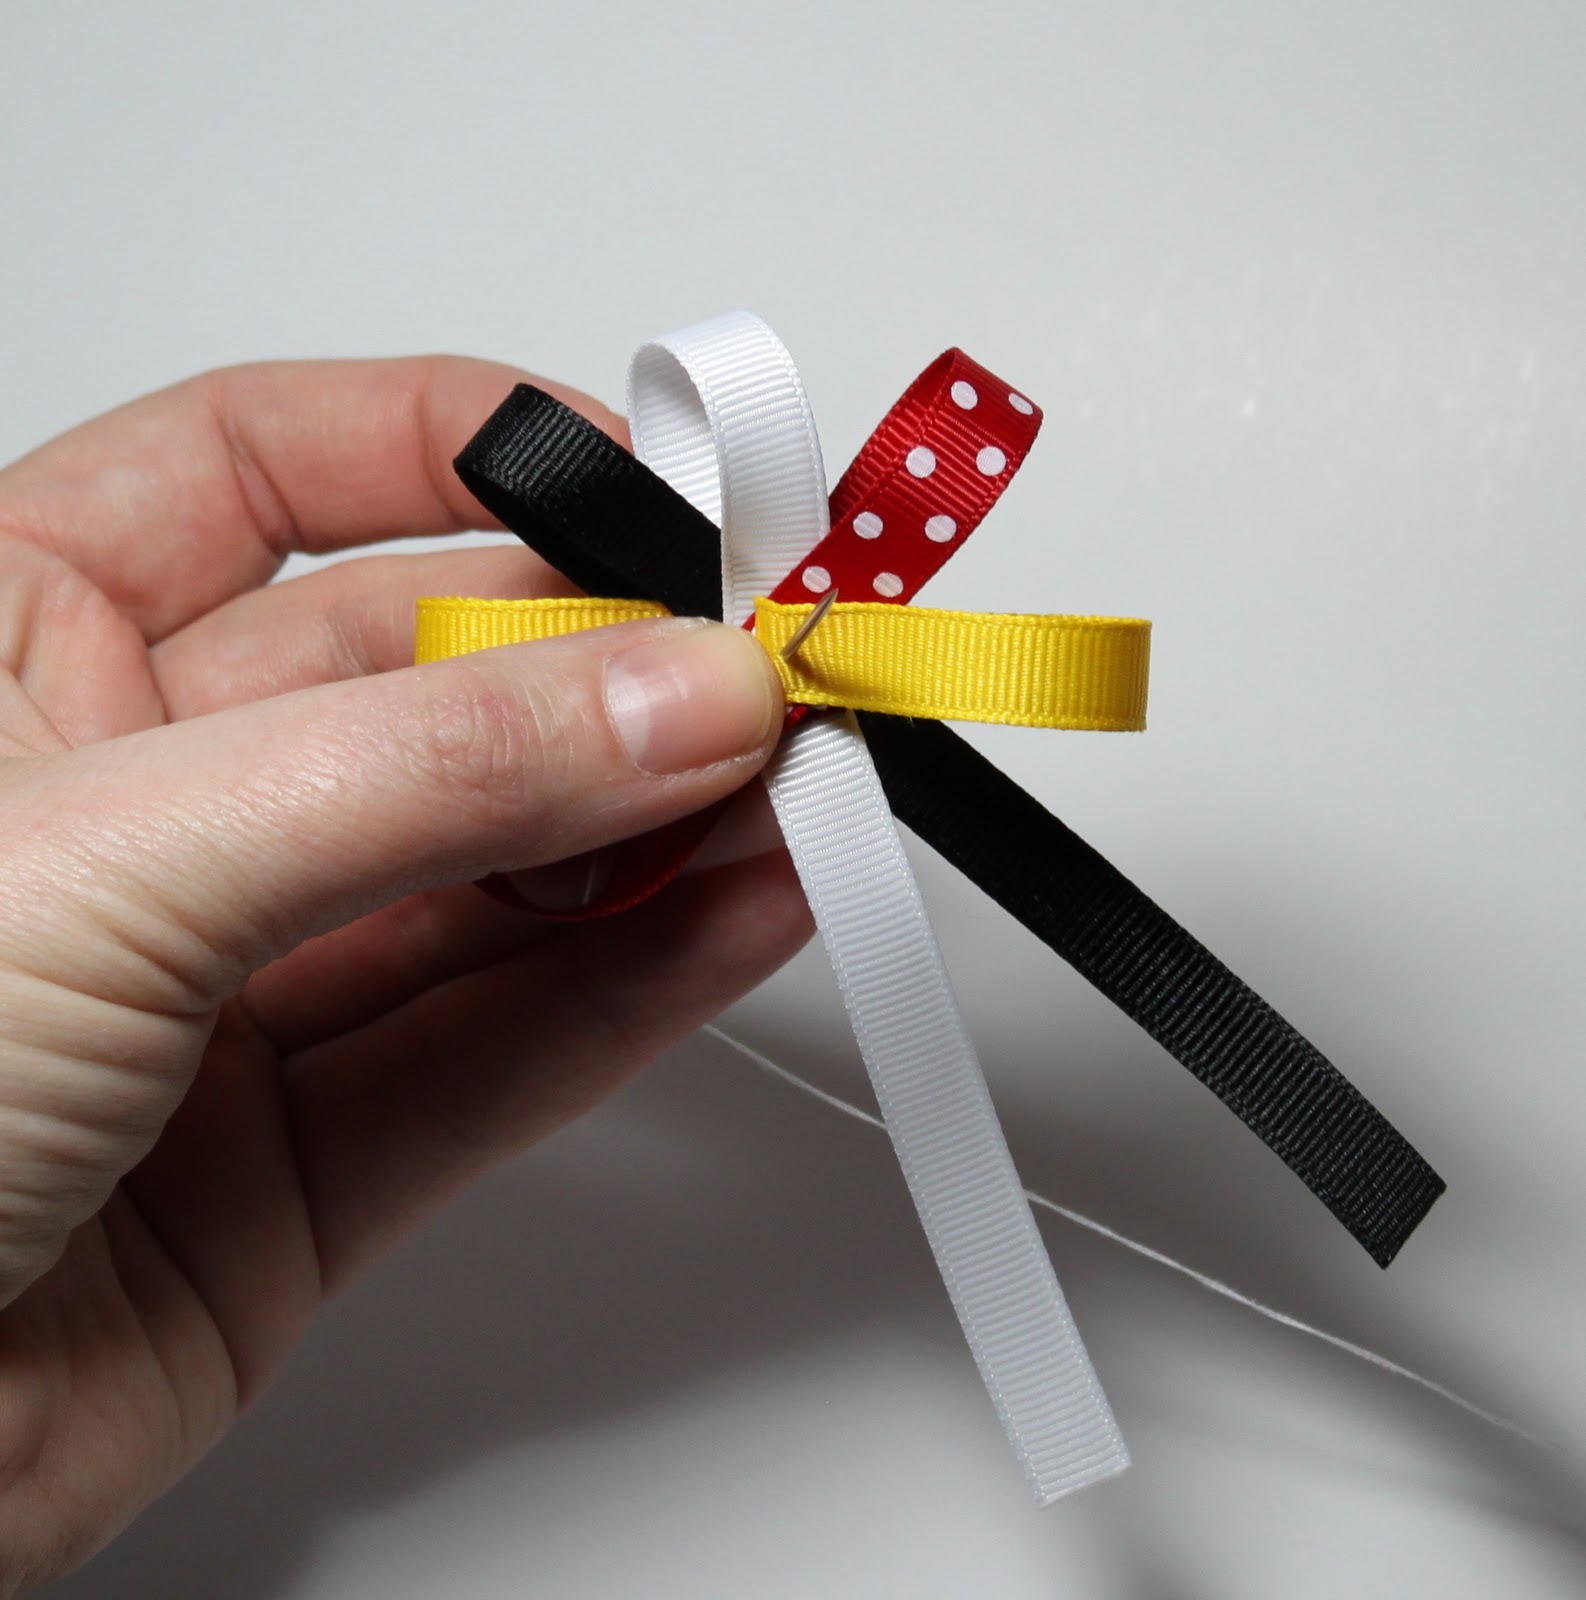
Things you need include ink jet iron transfer paper, ink jet printer, iron, and ribbon.  There are several tutes on how to complete this process.  The first time I tried it had to be about a year and a half ago, and it was a disaster!  Anyway, follow the directions and you can't go wrong!  Here are some of my lessons learned:

1.  Use a hot, dry iron and only press for about 15 seconds.  If you press longer, your image will yellow.  You might think holding the iron on longer will ensure your images transfer, but it just makes them discolored.

2.  Make sure you use a cloth to press between the iron and ribbon.  Grosgrain ribbon is polyester....and hot irons don't play well with polyester.

3.  Allow the ribbon to cool before you peel off the transfer paper.  This will ensure your image has stuck to your ribbon.  If you start to peel and the images aren't properly transferred, you can hit it with an iron for a couple more seconds.

4.  I have found the best ribbon to still be Offray...the texture just helps keep the transfer better (in my opinion!)  The smoother the ribbon, the harder it is for the image to stick...again just personal experience here.

5.  You can purchase "Print Your Own Ribbon" graphics on etsy from several different places.  I have learned how to create my own graphics.....but that is another topic altogether!!  My lesson learned here is to make sure you flip your images before printing.....example to follow!  If you look closely...the question mark block is backwards...ha!  I have to learn by doing, apparently!

Sweet and Sassy Stacked/Layered Hairbow--Princess Peach--Super Mario Brothers

Hope you enjoyed today's post!  I love when I learn something new :o)

Wednesday, March 23, 2011

Teaching the Girls to Embroider

My mom, Grammy, is a super talented lady....she taught me so much about sewing and I have so many great memories of her teaching me to be crafty!  She creates her own homespun embroidery patterns and sent some to the girls for Christmas this year....and we are finally getting around to using them!!  Emma had to learn that you CANNOT sew around the hoop....it was so funny!!  I think I re-threaded needles about a hundred times, but we had such a great time.  Dayna kept squealing about what a great time we were having and she was so glad I was teaching her...melted my heart.  I am thankful for my mom....and for having 2 wonderful daughters.  Forgive me for gushing 

Dayna before we started

Emma before starting

Am I doing this right??


You can see the blue line of stitching....she did SO good!!

Working hard!


This face was so funny!  Every time she wrapped the hoop with her needle!

They got the hang of it after a few minutes


Tuesday, March 22, 2011

Busy Life---Meet Evernote and E-mealz

I LOVE being a mom....and couldn't have asked for better children than my 2 sweet girls!!  It's the time of year for Easter dress shopping, which is so much fun for me.  I used to match the girls, but now that they are older, they like their own stuff.  I have to plan way in advance for things, because it sneaks up on me!  So yes, I realize that Easter is still over a month away :o)

It's tough being a mom who works 40 hours a week plus additional hours for my etsy business, in addition to keeping up with managing a household, 2 kids in school which means homework 3 times a week right now, and being the wife to a wonderful husband.  Said husband is amazing, too, btw!!  He make the girls' lunches in the morning while I get them ready...among other things.

Juggling everything can be overwhelming.  Especially when you're one of "those moms" who actually check homework before it gets signed off and forces piano practice to continue despite the overly dramatic complaints!  Yes, I am one of "those moms" and yes, it is FRUSTRATING sometimes when homework is wrong and you want it corrected and resistance is so thick you can cut it with a knife!  Whew....yes, I LOVE being a mom :o)  I also love tools that make my life easier.........

A friend of mine recently turned me on to 2 wonderful tools for busy moms:

1.  Evernote

2.  E-mealz

First of all, Evernote is a great tool for organizing my life, which is often so full of ideas for gifts, birthday presents, travel, and business ideas.  I have just begun using it and I am sure I am just touching the tip of the iceberg for how useful this tool is!  You can download it to any computer and your smart phone and then sync them together so you can access and add to anywhere, on the go or at home.  I am just in awe of its usefulness.  It is an idea book and filing cabinet all in one place!  This is going to rock my birthday and Christmas gift shopping this year!!

The second tool I am really excited about is E-mealz.  This tool is endorsed by money-saving guru Dave Ramsey as a tool to help you plan meals for the week and shop to save money.  For the cost of $5 a month, you receive a 5-day meal plan with accompanying recipes AND grocery list!  It doesn't get any easier than this!  I love meal-planning, but I am stuck in a rut right now...and trying to plan for a low-fat or Weight Watchers friendly meal is not the easiest when you are cooking for 2 adults and 2 kids and don't want to fix 2 meals!  These meal plans are for REAL people with no crazy ingredients.  The one drawback is that it is only 5 days a week, but I think I can manage the other 2 on my own :o)

My last thought is that I want my life as stream-lined and simple as possible so I don't miss out on my kids growing up.....they only do it once and I don't want to miss a second!

Thursday, March 17, 2011

Thoughts for Thursday

I love getting to know people through blogging!  I have been to so many great blogs and have met some amazing people!  So with that thought it mind,  here are a few facts about me:

1.  My active book on my Kindle right now is Sherlock Holmes.  I love to read and LOVE my Kindle!!  I am on the road to and from school and work so much and it's perfect for reading on the go.

2.  My favorite drink of all time is Diet Pepsi Wild Cherry.  As of right now, nothing beats it.

3.  I always have to have something to do....I can't stand just doing nothing.  This is probably why I have a gazillion hobbies!!

4.  I have knock knees.  Google it...nuff said.

5.  I HATE clowns!  They scare the crap out of me, whether they are meant to be cutesy and playful or scary and mean.  I blame the Scooby Doo cartoon with the clown at the carnival...scarred me for life.

Okay, enough sharing!  There's my 5 facts for today :o)

Wednesday, March 16, 2011

Managing Curly Hair

Ever since I was little, my hair has been curly and thick.  I inherited the curly from my mom and the thick from my dad.  I was doubly "blessed" and absolutely HATED it when I was young.  It was always out of control and a ball of frizz.  My mom did the best she could to help me tame the wild.  God bless her!!  On top of this, my head is very tender....so every time she came at me with a brush I screamed bloody murder!  We should've bought stock in Johnson and Johnson tangle remover!  It took me YEARS to figure out how to take care of this "blessing" so that I didn't look like Diana Ross every time I fixed my hair....seriously it's that big when I brush it out dry....mercy.  I still have bad hair days, and live where it is humid all summer long, but these tips have helped keep it under control and looking nice--most of the time!

1.  Invest in GREAT products.  I cannot emphasize this enough...I have spent so much money on cheap-o products and not only do I waste money, but I end up spending more because I have to buy more and more.

2.  Use a moisturizing shampoo and conditioner.  I LOVE Aussie products and use their Moist shampoo and conditioner. If you use a great conditioner, you don't need a leave-in conditioner.  It will over-condition your hair which leads to big-time frizz.

3.  Comb/Brush all hair when wet....and only when wet!!  Spray your hair with a detangler and let it set for about a minute before brushing...it helps!  If you are bold and want the Diana look, go ahead and brush out dry curls!  Otherwise, back away from the pick, brush, and comb.

4.  Repeat after me....Mousse is for VOLUME and Gel is for CONTROL.  I have dabbled with oh so many products here and have found that my all time favorite gel is Redken number 16.  Pricey but well worth it!  I have also been introduced to a new product called Curl Keeper.  I tried it and really liked it...still needed a touch of gel, but it is a great product with amazing results!!  You have to buy online since it is from Canada, but it is SO worth it!

5.  After washing, apply hair gel when it is wet and let it air dry until it feels a bit "crunchy."  Then blow dry with a diffuser.  If you can't wait until it is "crunchy," it will just be frizzier.  I flip my head over and blow dry so that all my hair gets dry.  Use your fingers here instead of a brush or comb!

6.  Find a hair stylist that knows how to cut curly hair.  Don't be afraid to ask if they feel comfortable with it.  Once I walked into the salon and the girl scheduled to cut my hair got a deer-in-the-headlights look all over her face...she was scared of messing up and wasn't confident.  My hair didn't look awful when I left, but it wasn't really what I wanted, either!

7.  Layers are your friend....long layers that is.  Unless you like the Q-Tip look, stick to long layers.  Also, if it's all one length, you will have the lampshade look.  I've had both and they are not attractive!!

8.  Don't be afraid of using hair accessories!  My hair is too thick for most clips and cute stuff, so I have had to make my own.  And using a non-slip grip on the clips has helped keep them in my thick hair.  My hair is "bigger" than most people's hair, so I am not at all afraid of using a larger accessory.  I love big flowers and headbands!

It is funny that neither one of my daughters ended up with my curly hair!  Sure enough, if I ever have a boy, he will have it!

Tuesday, March 15, 2011

Loopy Flower Hair Bow Tutorial

Before I begin, I have to say that I never realized how much I do not like my own hands until after I saw all these pictures...ugh...apologies in advance!  I was not meant to be a hand model, that's for sure!

I love these loopy flower bows...they are great for spring and summer!

Materials:

Ribbon
Layer 1--4 6" pieces of 3/8" ribbon (grosgrain works best, but you could also use satin)
Layer 2--5 7" pieces of 3/8" ribbon
Layer 3--6 8" pieces of 3/8" ribbon

Needle and thread
clip
embellishment for center of flower
hot glue gun
woodburner or fray check for ribbon sealing (could also use a lighter)

Heat seal all ribbon ends and keep the layer pieces separate.  For each layer arrange the ribbon in the order you want them to be for your bow.  Fold in half and insert your needle, but don't pull all the way through.
See my HUGE darning needle?  A MUST have for this bow!
You need a strong knot in the end of your thread.  Hold onto the bottom of the needle and fan out your ribbon.
One by one, bring your ribbon pieces over, stacking the ends of the ribbon onto the needle point.


Fan your ribbon so it doesn't look stacked.  Once all the ribbon ends are stacked on the needle, hold tight with one hand and use the other hand to go through all ribbon pieces a few times.  Knot the ribbon, while still holding tight.


Repeat this for each layer.

 Arrange so that the colors are evenly spaced.  Apply an ample amount of glue to the center of each layer and begin to stack the layers.
Once the layers are all glued together, add your embellishement to the center top and your clip to the center back!

Enjoy!

Monday, March 14, 2011

Never Too Old

I picked my girlies up from school today and they both were in rough shape.  They had good days, but were just spent.  Dayna, K-5, whined the whole way home and Emma, 2nd grade, could hardly breathe from allergies.  We got home and it was time for homework, piano practice, baths, dinner....the list goes on.  Emma was on the brink of a meltdown because "It's just too hard, I just can't do it!!" Normally, I am thinking "suck it up and quit complainin'" but tonight was just different.  I learned a valuable lesson.  You are never too old to be healed by sitting on your mama's lap. 

When I pulled my almost-8-year-old on my lap and just held her...it was like magic.  Her mood instantly improved and she was transformed back into herself again.  It's so hard to remember that she is still very young and can't always process the pressure she feels to get good grades,  keep her temper in check, be obedient and a good friend.  She still needs to be held and hugged and told it's okay if you don't get it on the first try.  Emma helped me tonight as much as I think I helped her.

Sunday, March 13, 2011

Growing Out Bangs

I have to say that both of my daughters have been blessed with some beautiful hair...I know I may be partial here, but you can't help it sometimes!  Emma has had  a few different hair styles and cuts...some of her own doing!  We tried to grow out her bangs when she was 4 and she got tired of them being in her face, so she just decided to cut them right off!  I found little piles of hair around the house for a few days.

She wanted her hair cut short a while ago, but now wants it long.  So here we go again with growing out hair!  I have tried to come up with some cute ways to keep her bangs back so she isn't always wearing a headband.  This braided style seems to be pretty popular as seen in Hollywood lately, and it's very easy to do, which makes mornings easier. 

It is basically a "french braid" braided just to the front of the hair.  Start at the part and begin your french braid.  I secured the braid with a small clear elastic since my daughter is a very active child! 

Cutie Pie!

Such a ham!

Friday, March 11, 2011

Tragedy in Japan

It pains me every time some disaster hits...so many people hurting and in need.  One of my good friends from high school lives in Japan.  Thankfully, she wasn't affected by the awful earthquakes and tsunamis that have hit her country.  I have been watching the footage all day and it is just so sad.  My heart goes out to them.  I hope that if I were ever to face such a disaster, I would continue to thank God for His goodness and love, despite my loss.  I feel blessed beyond what I deserve today.

Let's use today to show kindness to someone else....maybe a random stranger that just needs a smile.  I smile and greet most people I pass by...it's funny because most people are surprised!  It makes me a happier person and not so self-absorbed.  Kindness....just general human kindness....it's a rare thing until something tragic happens.  Don't wait until tragedy strikes to be a kind person...that is what I am striving for and what I am trying to teach my girls.

Just a thought for the day!  Now I would like to share some pictures of my 2 little treasures!

Emma riding a horse for the first time!

Dayna waiting her turn
Dayna riding a horse for the first time!

Thursday, March 10, 2011

Bow Making Series--Part Two--Hardware, Ribbons, and Embellishments

Definitely the most fun part of making hair accessories are all the wonderful ribbons and goodies to put together!!

Again, I had NO CLUE when I started making bows what to start with...these are just my thoughts from a few years experience behind me :o)

Hair Hardware--I buy my hair hardware online.  I can find what I am looking for more easily and the quality/price can't be beat.  I used to go to Sally's all the time getting single prong alligator clips, but they were always out of stock!!  Here are some of my favorite sellers:
  • Single and double prong alligator clips--I buy a lot of supplies from Etsy...these are mostly women like me trying to make a few extra dollars for their families and I am all about supporting that!  For my alligator clips, I buy from Accessory Junction on Etsy.  The owner is FAST and has quality clips.  I buy 400 at a time since the price is better as you purchase more.
  • French clips and headband forms--Hip Girl Boutique, LLC  
Ribbon--Yet another thing I have a HUGE preference for!!  I have tried them all and let me tell you, they are not created equal!!  The very best ribbon brand for making hairbows, in my opinion, is Offray, without a doubt.  They don't have a huge selection of printed ribbon, so that is something I go outside the brand for, but they have an enormous selection of plain colors and polka dots!  The Offray ribbon is sturdier and stiffer, so it keeps its shape much longer without a stiffener.  I buy my Offray ribbon from Tea Party Ribbons...they have the best prices and decent shipping time.  If you don't want to buy online, JoAnn's carried a full stock of Offray ribbon.

Printed Ribbon--There are TONS of printed ribbon places on eBay and Etsy, but I usually go to Oh*My*Gosh*Goodies.  She has fast shipping and a huge selection!

Embellishments--Swarovski crystals, buttons, etc can be found at crafts stores like Michaels and AC Moore. I have even found vintage clip-on earrings that are super cute for hairbow centers!

Now...want to know what to do with all this stuff?? Tune in Monday for my first tutorial on how to make a loopy flower bow...just in time for Spring!

Tuesday, March 8, 2011

Junie B. Jones Birthday Planning

Birthdays are a huge deal in our family!  I am fortunate that my girls' birthdays are about 6 months apart, so just when one is over, it's time to start planning the next girl's party!  Emma's birthday is in 2 months and she wants a Junie B. Jones birthday party...oh dear.  Emma is a bookworm, just like I was as a kid, so of course, she wants to have a party with her favorite characer!!  I haven't been planning and there is virtually nothing available to purchase for said party theme!  Time to read one of her books and get some ideas...I already have a CUTE idea for the invites...can't wait!!  Also, cannot believe my girl will be 8 years old.  I have no idea where the time goes!


Monday, March 7, 2011

Burial of a Legend

So, I think it is terribly ironic that I blogged last week about how much I LOVE my glue gun......and Saturday it died!!  Now, honestly, I use my glue gun DAILY and for hours at a time, so I have put it through a lot.  It still worked, but somehow it started oozing glue out of the trigger, which is not a good thing.  In the trash it went, and I bought another one with my 40% off coupon for Jo-Ann's!  So nice to NOT scorch my finger when pulling the trigger.  If I were to try to estimate hours of operation, I would say I used that baby for over 1000 hours.  Wow!

This week is going to be exciting!  Mardi Gras, Lent, Daylight Savings Time, and March Madness all this week! I am giving up sweets and soda for Lent...probably gonna kill me, but it has to be done.  I must break my bad habit and this is the perfect time to do it!  So tonight, I will be making these Beignets with my daughters.  Oh. My. Goodness.  They look amazing!! Wednesday is gonna be rough!

March Madness is the best! It all starts on Sunday with Selection Sunday...64 teams will be selected and the games begin.  Need a college hairbow?  Here are just a few from my shop:

Duke University Hairbow
Kansas University Bow
Tennessee Bow
Order now before March Madness is over!!

Friday, March 4, 2011

Getting Started as a Bow Maker--Part One--Equipment

I had no idea the kind of investment I would be making when I decided I wanted to learn to make hairbows for my girls!!  I don't even think Etsy was around when I had my older daughter, Emma...so I had to do with what I could find in the stores, which wasn't much.  I got the brainy idea, when I had my second daughter in 2005, to make them myself!

Once you buy all the initial supplies, it really isn't too expensive.  And trust me, I tried to cut corners to save money, but some things you just have to have to save your sanity!

Here are some of my absolute necessities as a bow maker:

1.  Glue gun--this is a MUST for most crafters anyway, but the kind of gun I love for bows is this model here:
    It is a detail glue gun that has a fine tip.  The glue gets super hot but doesn't glob up and thread all over the     place.  I have tried many other brands but the Surebonder is just the way to go!


2.  Woodburner--I know it sounds nuts, but you must have a woodburner for sealing off those ribbon ends!!  I tried to get away with a lighter to start with, but after rubbing my thumbs raw, decided to just go ahead and get the burner.  Now, a couple of thoughts about the woodburner:

  • It gets hotter than Hades, so BE CAREFUL about where you set this baby!!  It WILL slide (even with the stand) off the table and BURN your carpet, floor, lap, etc in no time!!  I have mine set up with the metal stand's "feet" under a book an the burner sitting on the book...so it doesn't slide anymore.  
  • I have 2 woodburners, one for dark ribbon and one for light ribbon.  Why?  When you do a lot of ribbon sealing, you can transfer colors to the lighter ribbon and NOTHING is worse than a white bow with brown, dirty-looking ends!!  So I have 2.  It also helps when you're sealing korker bows...that's a whole lot of ribbon sealing and the burners get dirty.  It helps to have an alternate.
3.  Thread and Needle--I have definite opinions about this because it is how ALL of my bows go together, boutique, korker, layered, stacked, etc!  I have tried to buy cheap thread and needles and only get frustrated when the thread breaks and the needles bend.  Trust me, there is nothing more frustrating than being almost done sewing together a korker bow and the ribbon breaks and korkers go flying!!
  • Needle--I only use a "darning" needle.  It is thick as can be and very sturdy!  I use it for all my bows and have only had to replace it a few times when the end gets dull.  It literally does not bend and can get the job done!
  • Thread--I only use "hand quilting" thread.  Thread tends to gather, break, twist and that is super frustrating!!  Hand quilting thread is designed to be used repetitively in and out of fabric, so it withstands the breaking and gathering that "all purpose" thread does.  It is more expensive, but worth your sanity!
  • Pins--just a few long sharp pins and pincushion
4.  Scissors--I know this is obvious, but get a good pair!  Cutting ribbon with dull, cheap scissors is awful!  I have a pair of large, grey-handled Fiskar scissors I bought at the craft store.  They were $15 and worth every penny!  I also have a pair of small embroidery snips for cutting thread.  They are Ginghers...super sharp, and ready for action.
5.  Ruler--I have an 18 inch clear acrylic ruler mounted on the edge of my work station.  It's so easy to measure when it's sitting right there.

So, I know this is a long post....but wanted to get my thoughts out there!  I like real-life, practical information and didn't have it when I got started!!  I did everything wrong at least once.  My next post will address the fun stuff about bows--ribbon, embellishments, and hardware!!
Related Posts Plugin for WordPress, Blogger...