
I love these loopy flower bows...they are great for spring and summer!
Materials:
Ribbon
 Layer 1--4 6" pieces of 3/8" ribbon (grosgrain works best, but you could also use satin)
Layer 2--5 7" pieces of 3/8" ribbon
Layer 3--6 8" pieces of 3/8" ribbon
Needle and thread
clip
embellishment for center of flower
hot glue gun
woodburner or fray check for ribbon sealing (could also use a lighter)
Heat seal all ribbon ends and keep the layer pieces separate. For each layer arrange the ribbon in the order you want them to be for your bow. Fold in half and insert your needle, but don't pull all the way through.

 |
| See my HUGE darning needle? A MUST have for this bow! |


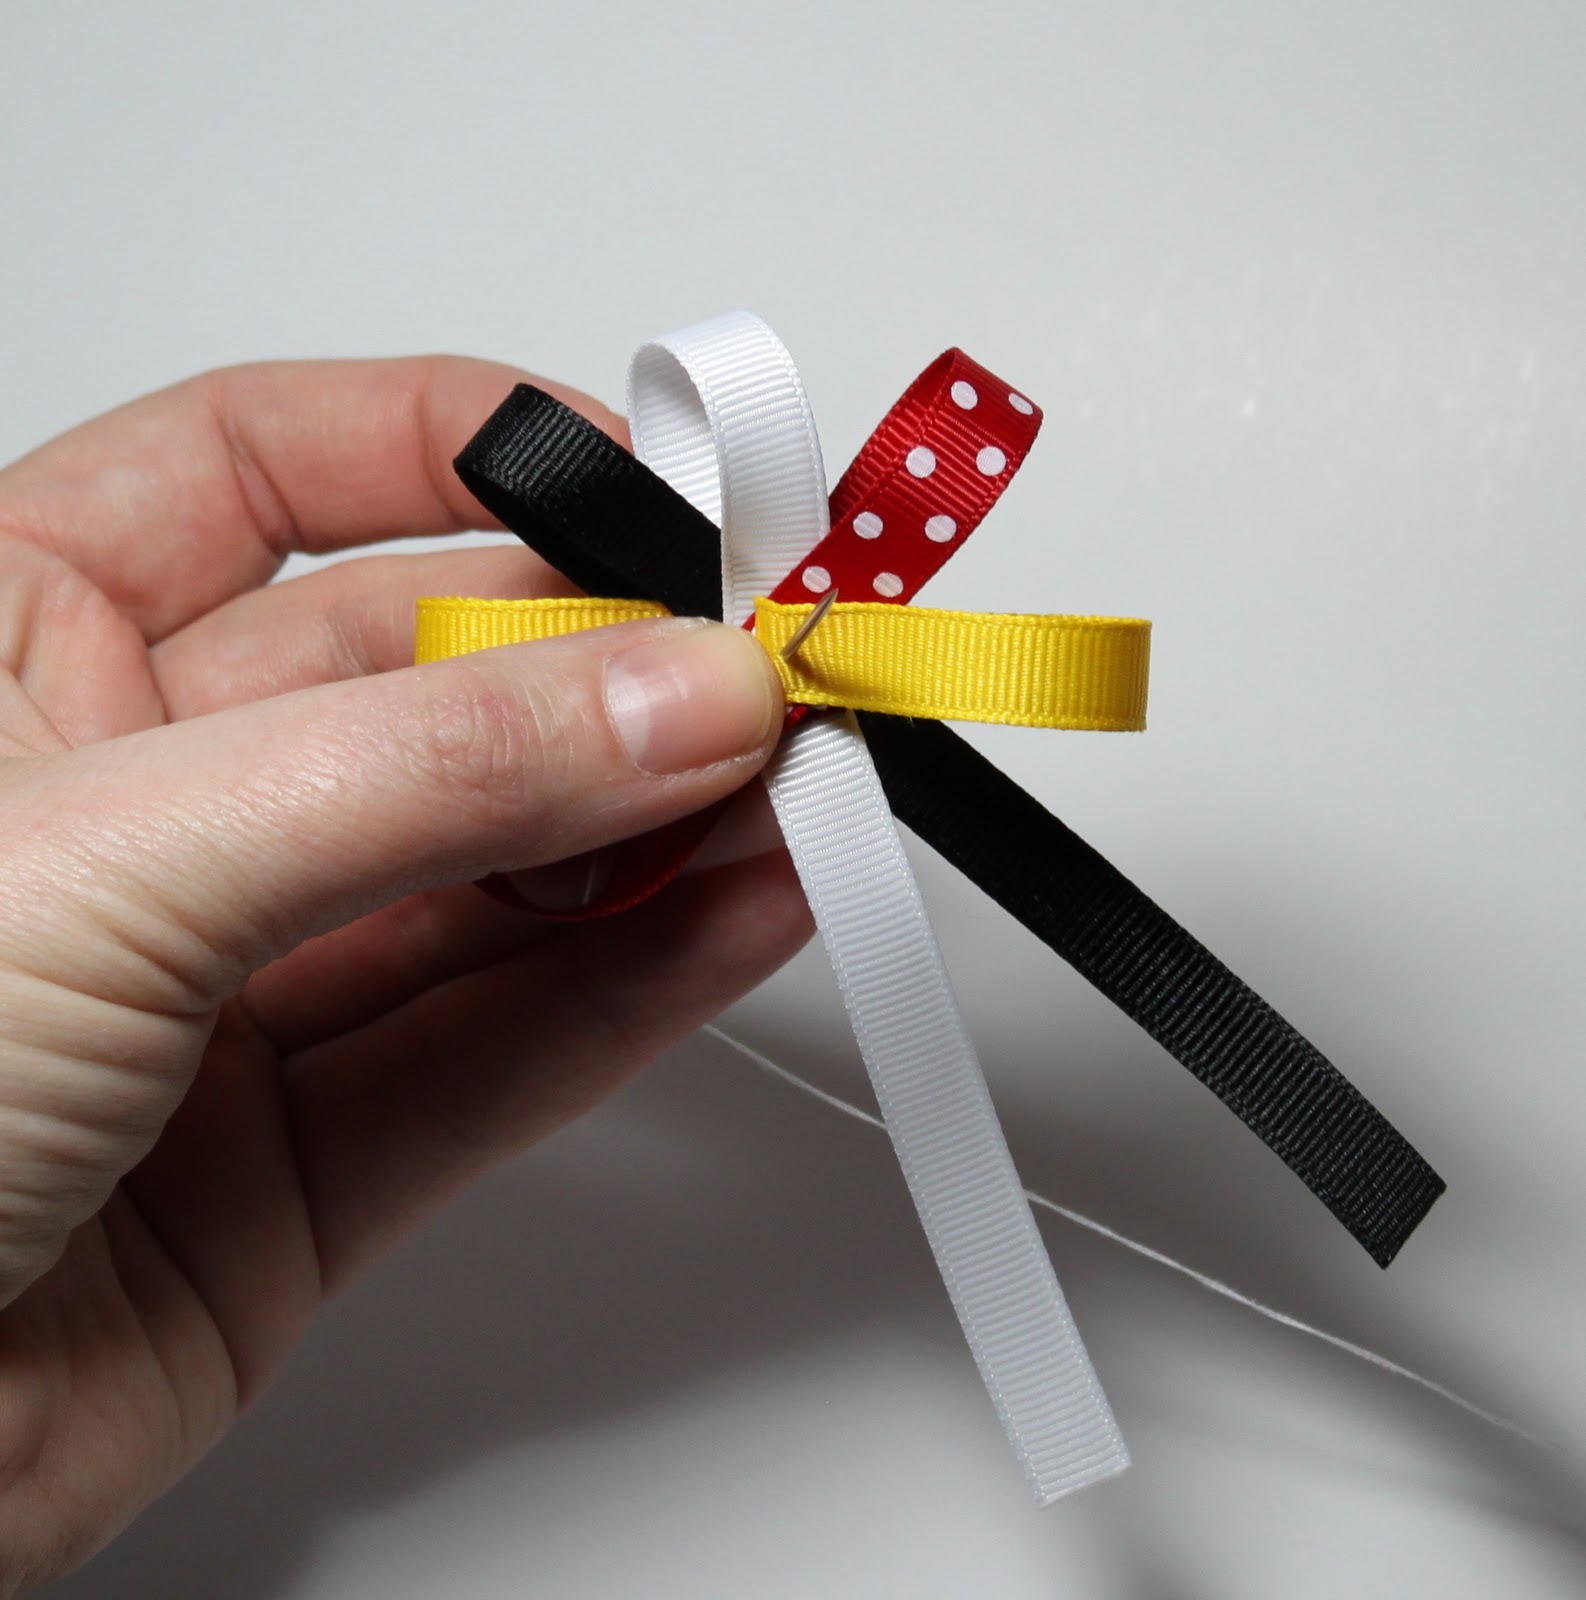
Fan your ribbon so it doesn't look stacked. Once all the ribbon ends are stacked on the needle, hold tight with one hand and use the other hand to go through all ribbon pieces a few times. Knot the ribbon, while still holding tight.


Repeat this for each layer.

Arrange so that the colors are evenly spaced. Apply an ample amount of glue to the center of each layer and begin to stack the layers.


wow, easy to understand and follow instructions.a beautiful bow!!!!!thanks for sharing.
ReplyDeleteWhen I made mine I felt like it was a little wobbly since the ends are stacked in the center. Then adding the center piece just adds to it. I LOVE this bow and want to make it work. Am I doing something wrong or is that just how it is?
ReplyDeleteHi Amy! Try adding more glue about the size of a quarter in between the layers. When you glue each new layer on, hold it for about 10 seconds. That will give your bow much more stability! I would LOVE to see your bow!
ReplyDeleteShanna
THIS IS AMAZING!! I JUST STARTED MAKING BOWS FOR MY LIL GIRL AND THIS IS ONE OF THE BOWS THAT I WAS IN LOVE WITH, HOWEVER I LOOKED ALL OVER YOUTUBE AND EVEN GOOGLED IT AND COULD NOT FIND A THING ON HOW TO MAKE THESE BOWS!! I CAME ACROSS YOUR SITE AND I AM SOO EXCITED TO ATTEMPT TO MAKE THIS BOW!! THANK YOU SOO MUCH FOR THE EASY AND THOROUGH STEPS!! :0)
ReplyDeleteThis is a great tutorial for a really adorable bow! I scoured the net a couple years ago for bow tutorials and it's been a while since I made any. I stumbled across this page via pinterest and it has reignited my bow fever :) I think some of the little girls in my life will be getting these in their stockings this year. Thanks!
ReplyDeleteIf I could make a suggestion, after looping all the ribbon ends onto the needle, it's important to make sure the loops are arranged the way you want them BEFORE you pull the thread through and make the stitches to secure the whole layer. Once the stitches are made there's no rearranging the layers. I've made two of these this afternoon and they turned out great. Thanks again!
ReplyDeleteHi Shanna! I love all your tutorials.. they are great! I cant wait to try this one.. looks great! :)
ReplyDeleteIm your newest follower for sure :)
Thank you so much for making this Tutorial, I have some Hello Kitty 3/8" ribbon I am going to use for this!
ReplyDeletethis is great! love it!
ReplyDeleteHey there!!! I wanted to show a bow I made with this tutorial. I really enjoyed the simple instructions with LOTS of pictures. Thanks so much for such a great tutorial!!! Dee =)
ReplyDeletehttp://deesbbboutique.blogspot.ca/2012/03/shanias-fun-fair-bow-2-for-silent.html
What a great tutorial! I have to say that when I saw your comment about your hands, of course my eyes went straight to them, lol! I have the same scar on my thumb, courtesy of reckless cheese slicing as a teenager!!!!
ReplyDeleteson muy lindos, gracias por la explicacion. Fabiana, desde Argentina
ReplyDeleteOh my gosh... thanks for sharing... I LOvE IT! Can I pin pictures from your blog?
ReplyDeleteShuttermom77 at gmail dot com
Trying to make these for our trip to Disney World. Where did you find the Minnie Mouse center?
ReplyDeleteI'm curious about that also, I'm surprised to find so few Disney crafting items. I've tried Hobby Lobby, Michael's and JoAnne's to little avail. I cannot find bottle caps either. :( Any suggestions?
DeleteI just found some on etsy
DeleteThank you for the tutorial! So easy to understand. I just finished making one and it came out great! Thank you again.
ReplyDelete